Tuesday, April 24, 2012

Color Mist Cookies

My brother, Ben, had his first holy communion this past weekend.  He looked incredibly handsome in his suit and white tie.  He loves to dress up.  When my mom asked him if he wanted to wear his older brother's tie from last year he said no, he wanted a new one.  Not only did he want a new one, but he wanted to go to the store and help her pick one out.  Not what you would expect from an 8 year old boy!

I knew I wanted to make cookies that would look as good as he did.  It would also be nice if they didn't take forever either, this whole moving to Texas 'thing' is kind of time consuming!  Here's what I ended up coming up with:

Well, I came up with the ones in the middle anyway.  My Aunt made the chocolate covered oreos, peanut blossoms, and puff pastry/lady lock type cookies.

I liked the blue and yellow colors together, and the absolute best part is how easy these cookies were to make!

Start by making your favorite sugar cookie recipe in what ever shape you prefer.  I found squares worked best for these designs for reasons I'll get into later.

Then go ahead and outline and flood your cookies with white royal icing.

Don't forget to pop any air bubbles ->


Once the icing has dried the real fun can begin!  To decorate the cookies I used color mist sprays I found at the local craft store.  I found mine cheaper than what they are listed for on Amazon, and was able to use a 50% of coupon, yay for saving money! 

There were two different designs I had seen floating around the Internet that I wanted to give a try, the first was gingham cookies at Glorious Treats and the other was simple but elegant ombre cookies at Sweet SuagrBelle. 

Today I'll show you the Gingham and then later this week the Ombre.  Both were easy, but took a couple tries to get right.  And they took a lot less time than any design with royal icing would have taken!

Ok, I would recommend picking a shape that allows you to cover the entire top of the cookie with icing.  Since I had a trim of plain cookie showing around the icing I was concerned about the dye from the spray showing up on the cookie (especially when using the blue).  So the first thing I did was to take some oak tag and rip it up into four strips (So that each piece had a straight edge) to cover the exposed cookie parts. The square shape obviously was the easiest shape to cover all the exposed areas.


You'll also want to cover your entire table with newspaper, just in case!


Once your cookie is safe with all the parts you don't want dyed hidden away you're ready to get started!

To make the gingham design I used a stencil I made out of oak tag with 1/4" wide strips cut out of it (I used an exacto knife to make clean cuts).  Take the stencil and lay it across your cookie.

In the picture you can see I also tries doing 1/2" wide stripes, they ended up being too big for my cookie.  Next I sprayed a LIGHT coat of color mist over the stencil and cookie.  If you want a darker color spray a light coat, give it a few seconds to dry and then spray another light coat.  If you spray too much at once it gets a watery, splotchy look and loses the designs sharp lines.

 Give it a few seconds to dry, it really didn't take long.


Then go ahead and flip the stencil to be going the other direction and spray another light mist over the cookie.


And voila! A beautiful and elegant cookie in just a few minutes! 


I had a lot of fun making these cookies, and am looking forward to trying this style again.  Next time I would perhaps grab some stencils, or make my own.  I hope you'll give these a try and impress your friends and neighbors!

Wednesday, April 18, 2012

What I've been baking part 2

There is so much to do before moving, and so little time to do it. We leave in less than a month, and I just added ‘sell car’ to the to-do list. Yikes, that will certainly keep me busy. Today I plan on hitting the internet and figuring out how much to price my car at, but before I get going on that I thought I’d finish up the rest of my dino lesson!

My last post I talked about how the studnents went digging for dinosaur bones and then identified them. After they dug up the bones (that I made at home) they returned to their sand tubs and started digging for fossils (we learned about fossils the day before).


I think I see one! When the students began to see what looked like a fossil they switched over to their brush tool to uncover it the whole way, they didn’t want to accidentally break the fossil!


And there it is! When their fossil was completely uncovered they put it in their bucket with their bone and headed back to their seats. Once seated they drew a picture of their fossil in their dinosaur notebook, just like a real paleontologist would do. Then they had to make an educated quess as to what they had found a fossil of.


Want to know the best part of the whole fossil experience? They made the fossils themselves. They actually made them the day before after we finished talking about fossils.

I made the ‘dough’ the night before (recipie below) using coffee grounds that Starbucks kindly saved up for me. To save time I split the dough into pieces for each kid, made it into a round disk shape and then wrapped it in parchment paper and placed it in a ziplock baggie. Then I collected sticks, leaves, stones, shells, and made dinosaur foot print stamps out of potatoes. The next day the materials were all out on the table and the kids just had to pull out their parchment paper wrapped ‘dough’ open it up and start stamping/pressing. We found, due to the dark color of the fossil dough, that the bigger, thicker objects to make impressions with worked better, i.e. footprint stamps, sticks, rocks. The leaves and shells still made an impression, but they had to press really hard. When their fossil looked the way they wanted I wrote their name on the parchment paper their fossil was on so we knew who belonged to each one.

The only downside to this was that due to the coffee grounds and coffee in the fossil dough it smelled like coffee( bet you figured that out already). The kids didn’t love the smell, and one of the kids actually had to walk away and look at a dinosur book while we made his fossil for him. This would probably work better outside. If you think your students/kids might not like the coffee smell you could try using the dinosaur bone dough instead. I did like how dark these fossils came out though, and a little rough which made them seem more real. In fact, some of the kids thought they were!

Fossil Dough

1 cup of used coffee grounds
1/2 cup of cold coffee
1 cup of flour
1/2 cup of salt

Mix all the ingredients together and then form the dough into ½ inch thick circles. Stamp and decorate away. You can either let them sit out for 24 hours to dry, or pop them in the oven at 350* for 20 minutes.

Then you can share your fossil with everyone!

Monday, April 16, 2012

What I've been baking part 1

I haven't posted much lately because things have been a little crazy. I just finished my last term working on my masters in School Library Media, with the hope of being a school librarian. Oh yeah, and I'm moving to Houston in a month! Yikes!
Anyway, finishing up my last term of grad school meant three classes and a 'student teaching' experience in the local middle school's library. Obviously, this kept me pretty busy, but it hasn't kept me out of the kitchen entirely. Just look at what I cooked up for school:


Yes! That is what you're thinking (as long as your thinking it's a dinosaur bone)! I did a three day mini unit in the library with the life skills students on dinosaurs. It turned out pretty well, and the last day was the best. I created a dinosaur dig for the students to participate in. There were two parts and I'll share the first part today.

I created dinosaur bones the night before the dig. I made 9 bones in three different 'styles,' the recipie is at the end. The next day I buried them in tubs full of sand. After a discussion about what a Paleontologists is, and instructions on how to dig each student got their own tool kit (a bucket, shovel and paint brush), a fun nickname (at their request) my favorites were: fossil, sharkman, and, of course, the girl who picked Ms. Kelly as her nickname:), and a visor. Then we went to work!


The students used their shovels to dig until they found what they thought was a bone. Then they switched to their paintbrush so that they wouldn't damage the bones they found. The kids did a great job!


Once they completely uncovered their bones they took them to a table nearby where they had to use the picture to figure out which dinosaur their bone came from. Once they knew what dinosaur they found they drew a picture of the bone and the dino it was from in the dinosaur notebook which they had used each day to take notes in.


I had planned to keep the bones, but the students were so excited about their finds I ended up letting them take them home. The bones weren't hard to make, I used this simple recipie which you could use to make your own bones, or any clay figurine you want. I used the recipie here

Bread Dough Clay

2 C. Flour
1/2 C. Table Salt
3/4 C. Water

Mix the salt and flour together. Then make a well in the middle of the flour and slowly add the water. Mix it with a fork or your hands (I used my hands). Knead the mixture till it is not sticky but smooth. It should feel similiar to clay. If it is to dry add a little water at a time, and if it is too wet add a little flour. Theny go ahead and make your bones! Place them on a baking sheet and bake them at 300* for about an hour. Keep an eye on them, depending on their size will depend on how long it takes. They're done when they are hard and starting to brown on the bottom.

I hope you'll give this a try sometime, it would be great not only for a school lesson, but for a dinosaur birthday party too!

Ok, name that dinosaur:

Sunday, April 8, 2012

Happy Easter


Happy Easter! Hope you are having a wonderful holiday full of family and friends!

Saturday, March 31, 2012

A sweet April fools joke!

Looking for an April fools joke that is easy, fun, and won’t make people want to retaliate by putting snakes in your bed? This is it!

Picture it: Offer your favorite child, friend, boyfriend, relative, or complete stranger a nice can of fruit.


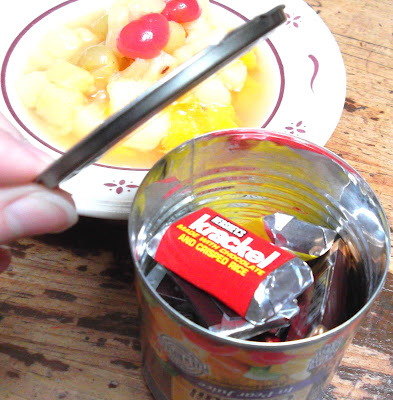
"Go ahead, pick any one!" Hand them their prefered eating utensil and watch as they pop the can open. Imagine their surprise when...


Hey! That's not fruit! it's...


Chocolate! Surprise! Who wouldn’t love to get chocolate when they were expecting fruit? The best part is that if they want to retaliate, they probably won’t put snakes in your bed or saran wrap over the toilet.

Here’s how you do it. Get a can of something with a pop-can top and a regular tin can bottom. I bought these fruit cocktail cans at Acme. Flip them over and using a can opened that releases the glue seal, NOT one that just cuts through the metal, take off the bottom.


Empty the fruit out then wash and dry out the inside of the can. Then fill the can with whatever you want. Just keep in mind that whatever you want them to see first you want to put into the can first, because the can is upside down.


Once you've filled it up with whatever you want to surprise people with hot glue the bottom back on. If you don't fill the can the whole way up you may want to stuff the empty parts of the can with tissue paper so your surprise doesn't rattle around, make a lot of noise, and give the game away.

Once the hot glue dries flip the can over and give it to your unsuspecting friend. It took me less than 15 minutes from start to finish. So if you're looking for an easy, cute, and fun April Fools joke, try this one!

Thursday, February 16, 2012

I am so fortunate to have you!

Happy Day after Valentine's! I know most people are ready to move on to the next holiday and swap out their red for green, but I have one more idea to share. Put it in the idea pot for next year because it is CUTE. Don't take my word for it though, just look:


Isn't it adorable? I got the idea at Eighteen25, only they did it for teachers for the first day of school. I book marked it months ago and had been eagerly waiting for the time to come when I could make it my own.


This can be an incredibly simple gift, make a cute tag, throw the cookies in the box, bam you're done. I like to make things hard though. I made the cookies from scratch. I even tried two different recipies! I also made my own 'fortunes.' Only instead of fortune's I did reasons I was fortunate to have them in my life. I also dipped the finished cookies in chocolate and decorated them with sprinkles. Fun, but time consuming!

As I said, I used two different recipies. If you are going to do this yourself (it's not terribly hard, but does require a little practice), you need to decide what is important to you. The one recipie tasted like a regular fortune cookie, and looked nice when it was done. The second recipie was much better tasting than a regular fortune cookie, but didn't fold as nicely (the cookie would tear/crack). So you need to make a chocie there. Since I was giving them as gifts and was giving lots of them I didn't have time to fool around with the cookies so I used the first recipie. Still tasty, and since they never had the second recipie, they don't know what they're missing anyway!

The tastier recipie I found at Haniela's. I didn't have the cake and cookie emulsion, so I used 1/2 t vanilla and 1/2 t. almond instead

The easier to fold recipie I found at About.com

I found a great video on how to fold them here

I would HIGHLY recommend wearing thin cotton gloves (I bought mine at CVS). You fold the cookies while they are hot, and doing it with out the gloves was no fun, I had to go buy some gloves.

And for funsies, here is an adorable idea I saw someone had for halloween

I hope you had a lovely holiday, and that you put this idea away for a time when you need to tell someone how fortunate you are to have them in your life.

Tuesday, February 14, 2012

Happy Valentine's Day


Whether you are with someone or not, I hope you have a wonderful Valentine's Day. Take time to tell someone you love them, and maybe do something little for them. I think everyone just wants to be and feel loved. I think Valentine's day is a great reminder of that!

Tuesday, February 7, 2012

Pumpkin Scones

I was hoping to share some tasty chocolate chip cookie dough brownies that I made for the super bowl with you today, but they ended up being a failure. :( I hate when that happens, I get really excited about something and then it's a flop, it's even worse when you were planning to give them to people, let's say at a super bowl party. Luckily I have an amazing friend named Mandy, who likes baking as much as I did. She made these awesome red velvet cupcakes with blue icing, and decorated them with football candies and wrote out Pats, Giants, and XLVI in white chocolate and put those on as well. Not only were they incredibly cute, they were delicious. I wish I had taken a picture instead of just eating them up!

Anyway, so instead of yummy brownies I have something entirely different, Pumpkin Scones. I found this recipie over at Recipie Girl several months ago. I just made them for the second time when my cousin was visiting for her birthday. I made the scones and Blueberry Buckle thinking the Buckle would go first, but everyone ate up the scones and I can't blame them, they're delicious!


<3 Pumpkin Scones <3

SCONES:
2 cups all-purpose flour
3/4 cup granulated white sugar
1 tablespoon baking powder
1/2 teaspoon salt
1/2 teaspoon ground cinnamon
1/2 teaspoon ground nutmeg
1/4 teaspoon ground cloves
1/4 teaspoon ground ginger
1/2 cup canned pure (unsweetened) pumpkin
3 tablespoons half and half cream
1 large egg
6 tablespoons cold butter, cut into cubes

PLAIN GLAZE:
1/2 cup powdered sugar (sifted)
1 tablespoon milk (any kind)

SPICED ICING:
3/4 cup powdered sugar (sifted)
1 to 2 tablespoons milk (any kind)
1/4 teaspoon ground cinnamon
1/8 teaspoon ground nutmeg
pinch of ground ginger
pinch of ground cloves

Directions:


1. Preheat oven to 425°F. Spray baking sheet with cooking spray or line with parchment paper. Give it a light dusting of flour on top of that.

2. In a large bowl, whisk together dry ingredients (through ginger).

3. In a separate bowl, whisk together pumpkin, half and half and egg.

4. Use a pastry cutter or two knives to cut butter into the dry ingredients. Continue cutting until the mixture resembles fine crumbs. (You may also use a food processor for this step. Pulse until the mixture resembles fine crumbs).

5. Fold wet ingredients into dry ingredients, then form the dough into a ball. The dough will be wet, but if it seems super sticky... just go ahead and sprinkle a little more flour into the dough until it's easier to handle. Remember, you want it to be somewhat sticky, and that's okay- but you also don't want it to stick to the baking sheet. Pat out dough onto the lightly floured baking sheet and form it into a 1-inch thick rectangle that is about 9-inches long and 3-inches wide. Use a large knife or a pizza cutter to slice the dough. It works best to cut the dough into rectangles or squares and then cut those into triangles. The originial recipie called for cutting 6 scones, but when I did that the scones were huge, so the second time I cut 12 scones, and they were the perfect size. Gently pull the triangles apart, leaving about 1/2-inch space between each one.

6. Bake 14 to 16 minutes on prepared baking sheet. Scones should begin to turn light brown. (they'll run back into each other a bit, but theyll be esy to seperate later so don't worry)

7. While scones are cooling, prepare plain glaze by whisking ingredients in a medium bowl. Mix until smooth.

8. When scones are cool, use a knife/pull them apart. Use a brush to paint a coating of the glaze over the top of each scone.

9. As the white glaze firms up, prepare spiced icing by whisking the ingredients in another medium bowl until smooth. Drizzle this thicker icing over each scone (or brush it on) and allow the icing to dry before serving.

* the first glaze keeps the second one from seeping into the scone and makes them look a bit nicer.


I hope you'll give them a try, they freeze well and still tasted good several days after I made them.

I plan on trying the chocolate chip cookie dough brownies again sometime, after I change the recipie a bit. For now I am focusing on a baking competition I am helping my brother, Bobby, with for boy scouts. The theme is the circus and we'll be doing a buttercream transfer of a circus tent and animals. Wish us luck!

Friday, February 3, 2012

Superbowl Snack Must Have

I'm not a huge sports fan. I generally don't watch sports very often, except for the four years at Penn State where I was at almost every home game. I know for a lot of non-sports people the super bowl is the one time of year they make sure they watch (if only for the commercials). I didn't even used to do that. In fact, when I was in Girl Scouts we used to go on a ski trip on Superbowl Sunday. So no superbowls for me, unless the Steelers are playing. To me it's really only fun if you really want one of the teams to win. That being said, I'll be watching this year as my boyfriend is a Giants fan. He's having a few of our friends over and I will be routing for the Giants to win. What I am most excited for though is the food! We're still talking about what to have but we know for sure that Ryan is making some delicious wings (we tested them out last night, yum!), and I'll be making brownies, and Pizza Pretzel Bites.

I stumbled across Pizza Pretzel Bites at Two Peas and Their Pod a few months ago and made them for a fun dinner one night and since then have been hooked! They are delicious and my favorite thing, easy. I could rave about how good they are, but here's something better: I made them for my cousin's birthday party last Friday and forgot to take a picture before I put them out. As soon as I remember I grabbed a picture. There were about 50 pizza pretzel bites and 7 people at the party, less than an hour into it here's what was left (we also had nachos, popcorn chicken, and drinks.... lots of drinks)


Whatever you are serving for the Superbowl, you should really think about adding these to the menu!

<3 Pizza Pretzel Bites <3

1 1/2 cups warm water
2 tablespoons brown sugar
1 package active dry yeast
3 ounces unsalted butter, melted (the recipie called for unsalted but I used salted once and didn't notice a difference)
2 1/2 teaspoons kosher salt
4 1/2 to 5 cups all-purpose flour
Canola oil
Pepperoni slices, cut into small pieces (I ripped them into quarters)
Mozarella Cheese, cut into pieces (I found a block works better than shredded)
5 quarts water
3/4 cup baking soda
1 whole egg, beaten with 1 tablespoon cold water
Coarse sea salt
Pizza sauce-for serving

Directions:
1. Combine the water, sugar, yeast, and butter in a bowl and mix until it just combined. Let that sit for 5 minutes. If you have a stand mixer or dough hook use that to mix this dough up.

2. Add the salt and flour (4 1/2 cups) and mix on low speed until combined. If you don't have a dough hook turn it out on a lightly floured surface and knead for five minutes, adding flour if it's needed. The dough will be a little sticky, but should be easy to work with. If you have a dough hook on your stand or hand mixer just turn the speed up to medium and let the mixer do the work (3-4 minutes), until the dough is smooth and begins to pull away from the side of the bowl. Remove the dough from the bowl, place on a flat surface and knead into a ball with your hands.

3. Oil a bowl with canola oil, add the dough and turn to coat with the oil. Cover with a clean towel or plastic wrap and place in a warm spot until the dough doubles in size, about 1 hour.

4. Preheat the oven to 425 degrees F. Bring the water to a boil in a large pot over high heat and carefully add the baking soda (it will bubly up like crazy!).

5. Remove the dough from the bowl and place on a flat surface. Grab a piece of dough and wrap around some chopped up cheese and peperoni. The size is up to you, mine were about an inch long. Make sure the ends are pinched tight so the cheese doesn't escape while baking. Set bites on a baking sheet and continue until all pretzel bites are stuffed.

6. Boil the pretzel bites in the water solution in batches. I did about 6-10 bites at a time. Boil for about 30 seconds. Remove with a large slotted spoon. Place pretzel bites on a baking sheet that has been lined with parchment paper or a Silpat. Make sure they are not touching (they will spread!). Brush the tops with the egg wash and season liberally with the salt. Place into the oven and bake for 15 to 18 minutes, or until golden brown.

7. Remove from oven and let cool for five minutes. Serve warm with pizza sauce.

if this sounds like a lot to be doing game day you can make them up ahead of time. After you stuff the bites place the tray you placed them on in the freezer for 5-10 minutes. Once they're a little frozen you can chuck them in a ziplock bag and store it in the freezer till game day. The day of the game just take them out of the bag and boil them, spread the egg wash on them, add salt and bake. That's how I have made them every time, and they taste delicious.

Hopefully you'll give these a try, if not for the superbowl, for another occasion soon. And who ever you are routing for, enjoy the game! And the food!

Wednesday, February 1, 2012

Easy but impressive decorated sugar cookies

While I have always enjoyed baking, it is when I started decorating sugar cookies that I discovered how pretty you can make desserts. It actually started two years ago when I made large plain pink sugar cookie hearts for my friends and wrote their names on them for a little V-day gift. They were delicious, beautiful, and didn't really take a ton of skill, just patience. The cookies I made this year for Valentines are the same way:


To make these cookies all you need are:
1) Heart shaped cut out cookies (I used a chocolate cookie I ended up not loving, use whatever recipie you like. It will work best if the cookies have a flat surface on top when they finish baking, nothing that rises too much)
2) 20 second royal icing (I use Wilton's recipie and add a little vanilla. Then you want to run a spatula through it and count the time till the surface is smooth again. It should take about 20 seconds. Add a little powder sugar if it takes less than 20 seconds and a little water if it takes more than 20 seconds)
3) A squeeze bottle like these Wilton ones
4) A ruler
5) A toothpick, or clean needle, or knife

The first thing you want to do is to take your cookie and draw a grid on it. I used the ruler to keep my lines straight and evenly spaced, but you could probably just wing it too. I used a toothpick to draw the lines in the cookie, but would recommend a clean needle or knife since I had to keep using new toothpicks


Once you finish scoring all your cookies (a nice activity to do while watching tv), brush the cookies off well (since you'll have little crumbs from scoring them) and grab your squeeze bottle filled with 20 second icing. Pick a square and outline it, then color it in, all with the same icing. 20 second icing is a good consistency that won't spread much.


I used the toothpick you see in the picture to pop any air bubbles that there are in the icing. Now you want to start filling in squares! I found it best to do every other row first like this:


This gave the corners a chance to dry a little so they didn't run into each other. Next you want to keep filling in squares but none that touch length wise, only corners, until your cookie looks like this. You can see a couple places where the corners ran together and don't look as sharp. Doing every other row helps get rid of that.:


Then put it aside and start your next cookie. After an hour or two you can go back to the first cookie and fill in the rest of the squares, the result is cookies that look like these:


Yes, it is a little time consuming, I would say it took me about 10 minutes to decorate each cookie from start to finish (not including drying time), but it's easy and pretty! I hope you'll give it a try sometime!

Monday, January 30, 2012

Rose Meringue Cookies

I made meringues for the first time since my Baked Alaska disaster last week,and was succesful. It was really a practice session for these beautiful cookies. If I couldn't make regular meringues, there was no way I could make roses. But I could, and I did! Look:


They turned out great, especially for my first time trying it! I first saw the idea at Haniela's Blog. I unfortunately didn't have the tip size I wanted on hand so the rose buds aren't quite what I was looking for but they still turned out well. I also tried to do an open rose, but the meringue wasn't stiff enough to hold the shape so they ended up looking a little flat. I'll try the recipie again sometime to see if I can improve. The closed roses weren't hard to do, they just took a little practice, and with the right tip they'll look much better than mine! Here's the recipie I used:

<3 Meringues <3

4 large egg whites
3/4 cup sugar
1 tablespoon meringue powder
pinch of salt
1 t Vanilla extract
desired food coloring

Preheat oven to 180*

Directions:
1) Use a whisk to combine the egg whites, pinch of salt, sugar and meringue powder in a heat proof bowl.
2) Set the bowl over a pan of simmering water (the bowl should not touch the water and whisk constantly, until sugar dissolves and the mixture is hot to the touch, about 6-8 minutes or so.
4) Remove the bowl from the double broiler and beat with mixer gradually from low to high until stiff peaks form. About 8-10 minutes.
5) Add the flavorings and mix for a minute or so to incorporate the extract. Then add the food coloring and beat till the meringue is no longer streaky
5) Make roses!
6) Bake in a 180* oven on a baking sheet for 2.5-3 hours, or until dried through. Baking times will vary depending on the size of the rose. Leave them in the oven to cool.


Now, if you want to make them look like roses you will need:
A piping bag
A wilton tip # 125 (I used a much smaller one, but would recommend this one!)
parchment paper cut into 1" squares
a flower nail (or you can use a meat themometer with a flat surface)

Wilton has a written tutorial available here that looks more like my roses, and Haniela has a video tutorial here with, I think, more realistic looking roses.

Give it a try if you want to try something new that looks pretty and tastes good too!

One last thing, that box they're in? It's a paper plate! I made it in less than 5 minutes when I realized I didn't have a cute way to give them to my friend, Heather, who I was meeting for dinner. I saw the idea at Sarah Hearts, she has a great video tutorial there. I made a few changes by rubber stamping hearts on the top of the plate before I started, and since I didn't have any washi tape I just used regular scoth tape and tied a ribbon around the box to make it a little fancier.

I was extreamly pleased with how it all turned out. It would make a fantastic Valentine, Mother's Day, or really any day present. Hopefully you'll give it a try!

Shared at Blue Cricket Design

Saturday, January 21, 2012

Red Velvet Cheesecake Cookies

It's that time of the year again, when everything turns pink or red, and love is in the air. Or hate, if you're one of those people... I'm talking about Valentines Day! Whether you love it, or hate it, it's a great baking time of the year! Great sweets in happy colors with hearts galore. I love it! To kick off Valentines Day bake-a-palooza I made these amazing Red Velvet Cheesecake Cookies. I stumbled across them over at Two Peas and their Pod at Christmas time and have been waiting for Valentines to make them!


They're so pretty! And Red! Perfect for the holiday, and the best part? They're easy! They were inspired by the Red Velvet Cheesecake at The Cheesecake Factory, but my brother Ben (8) said they tasted more like a brownie (he also had some great ideas for making them into a brownie pie). Of course, the best part is the surprise in the middle, yum, cheesecake.

So if you want to make a treat that wows but doesn't take tons of effort, these are a definite winner.


<3 Red Velvet Cheesecake Cookies <3


*I made 11 large cookies, but you could make smaller ones*


For the cookies:


1 box red velvet cake mix (I used Duncan Hines)
2 tablespoons all-purpose flour
2 large eggs
1/2 cup canola oil
1 teaspoon vanilla extract


For the cheesecake filling:
4 oz cream cheese, at room temperature
2 cups powdered sugar
1 teaspoon vanilla extract


For the white chocolate drizzle:
1 1/2 cups white chocolate chips, melted


Directions:
1. To make cookies, in a large bowl combine cake mix and flour. Whisk until clumps disappear(at least most). In the bowl of a stand mixer, mix together cake mix, flour, eggs, oil and vanilla extract. Mix until smooth. Wrap the dough in plastic wrap. The dough will be oily. Refrigerate for at least two hours.


2. To make the cheesecake filling, using a mixer, combine cream cheese, powdered sugar, and vanilla extract. Mix until smooth. Using a teaspoon, scoop out cheesecake filling and place on a plate. Continue scooping out cheesecake filling into teaspoon balls until you have 11. Place plate in the freezer and freeze for at least two hours.


3. Preheat oven to 350 degrees F. Line a large baking sheet with parchment paper or a silicone baking mat. To assemble the cookies, take about 1/4 cup of red velvet cookie dough and flatten in your hands. Place a teaspoon of cheesecake filling in the center and wrap the cookie dough around the filling. Gently roll into a ball and place on prepared baking sheet. Scoop onto lightly greased or parchment lined baking sheets. Only bake 3 cookies at a time. The cookies are large and will spread. Bake for 11-13 minutes or until the cookies begin to crackle. Let the cookies cool on the baking sheet for 5 minutes. Remove from baking sheet to a wire cooling rack and cool completely.


4. Melt the white chocolate chips in a microwave safe bowl or over a double-boiler. Drizzle the white chocolate over the cooled cookies. Let the cookies set until the chocolate hardens. Serve and enjoy!


Shared at Lady Behind the Curtain and at Creations by Kara and 733

Friday, January 20, 2012

Peanut Butter Chocolate Muffins


I've never been big on making muffins, but when I saw a recipie for Peanut Butter Chocolate Chip Muffins at Annie Eats I knew I had to give it a try! I'm glad I did, they had a great peanut butter flavor that wasn't too strong (too much peanut butter weirds me out!), and it was nicely broken up by the chocolate chips. Another nice thing about this recipie is that it only uses 3/4 cups chocolate chips, so if you have extra chocolate chips laying around (does anyone ever actually have that problem?) you can use them up by making delicious muffins.
<3 Peanut Butter Chocolate Chip Muffins <3
2 ¼ cups all-purpose flour
2 tsp. baking powder
½ tsp. salt
2/3 cup brown sugar
6 tbsp. butter, melted and cooled
½ cup peanut butter
2 large eggs1 cup milk
¾ cup chocolate chips
Directions:
1) Preheat your oven to 375°. Then line a muffin pan with 12 paper liners.
2) In a medium bowl, whisk together the flour, baking powder, salt and brown sugar. Set this aside.
3) In a large bowl, whisk together the melted butter, peanut butter, eggs and milk until smooth. 4) Add the flour mixture to the wet and stir until just combined.
5) Stir in the chocolate chips.
6) Divide the batter evenly between prepared muffin tins, filling each to the top.
7) Bake for 17-20 minutes or until a toothpick inserted in the center comes out clean.

Sunday, January 15, 2012

My Cup Runneth Over - I Made Meringue Cookies!

My first baking project for my blog was a success! Hurray! To understand my excitement, a background story: When I was in college I tried to make Baked Alaska. I'd had it before, helped my mom make it, and was (in my opinion) a competent baker. No problem, right? WRONG! I don't know what I did wrong with the meringue (I'm guessing several things) but it never got hard, so it didn't form a protective layer between the ovens heat and the ice cream. I'm sure you can imagine what a mess it made. A BIG one, if you can't. I decided to wait a while to try meringue again, and four years later I gave it a second whirl!

Voila!


Now that I know that I can make meringues I plan on making them prettier. Hopefully next week I'll have a creative meringue idea for you.

Before I got started I looked up some meringue tips, and learned some interesting things about meringue. Did you know there are three kinds? French, Swiss and Italian?

"There are 3 types of meringue, the one made most commonly at home is French meringue which is made by whisking sugar into beaten egg whites. Swiss meringue is made by beating egg whites and sugar together over a pan of hot water until the sugar has dissolved, then beating until the mixture reaches stiff peaks. Italian meringue is made by whisking a hot sugar syrup into beaten egg whites - it is the most difficult to make but is popular with bakers and caterers as it tends to hold its volume well." - From Nigella.com

Some tips I found and followed were:

1) Eggs - Should be fresh, but at least 3-4 days old
2) Separating eggs - It's easiest when they're cold, so do it then. Make sure there is NO YOLK in the egg whites, the meringues don't like it. After they're separated let the whites sit out till they're room temp, about half an hour.
3) Meringue will not work if there is any grease in the bowl so use a glass or stainless steel bowl and make sure it is clean and dry! (a couple places recommended spritzing it with lemon juice and then drying it out)

Once I had all the tips I gave it a whirl! I used Haniela's recipe:

<3 Meringues <3

4 large egg whites
3/4 cup sugar
1 tablespoon meringue powder
pinch of salt
1 t Vanilla extract

Preheat oven to 180*

1) Use a whisk to combine the egg whites, pinch of salt, sugar and meringue powder in a heat proof bowl.
2) Set the bowl over a pan of simmering water (the bowl should not touch the water). 3) Whisk constantly, until sugar dissolves and the mixture is hot to the touch, about 6-8 minutes or so.
4) Remove the bowl from the double broiler and beat with mixer gradually from low to high until stiff peaks form. About 8-10 minutes.
5) Add the flavorings and mix for a minute or so to incorporate the extract.
6) On a baking sheet lined with parchment paper drop spoonfuls of the meringue. They won't spread so they can be close to each other, but not touching.
7) Bake for 2.5-3 hours, or until dried through. Baking times will vary depending on the size of the meringue. Leave them in the oven to cool.
8) Enjoy!


6 out of 6 people who had these cookies thought they were good, I hope you do to!

Sunday, January 8, 2012

Welcome to Blogging!

Welcome to my first blog! I am new to blogging and may take a while to get my 'feet under me,' but am excited to be trying something new! I have been baking since I was a kid but over the past two years have started doing it more and more. I've been branching out and trying new recipies and new techniques. I thought a blog might be a great way to organize my recipies and share my baking adventures with anyone out there who loves baking too.

That header will hopefully be temporary. I'm not particularly computer savy but am hoping to get better through the course of blogging. The pictures running down the left hand side are cut out cookies I made for my sisters wedding. Along the bottom a cake I made when my boyfriend got promoted, a cake I made for the fourth of July, and finally my mom's 50th Birthday cake.

Now I need to get baking, so I can get blogging!